
Time-lapse photography is a technique whereby the frequency at which the slow-changing scenes or objects are captured as a video played in a high speed. For example, the blossom of a flower, the rotting of food, the sunset and the moonrise usually takes us several hours or even days to spot and sometimes the change won’t be noticed by our naked eyes. In fact, we can compress photos into a video in several-minutes playtime to create the time-lapse effect. After all, viewing the whole changing in several minutes is a pretty interesting experience. In this post we will show you how to make time-lapse video.
Tips for making time-lapse photos before you get started
Choose a subject
You may have a desired subject in your mind, but we still recommend you to choose one that is hardly able to be noticed by our naked eyes. Here we offer some interesting subjects for you to select.
- Sunrise and sunset or moonrise and moonset
- Flower blooming
- Food rotting
- Ice melting
- Plant growing
- Seed germinating
- Cloud moving
- Star moving

Prepare a camera and a tripod
To make time-lapse video, you should take as many photos as possible. Thus, you need an easy-to-use camera and especially a tripod to keep your camera completely level. Actually, a tripod is important to keep a camera stationary when it constantly takes photos. Recording a time-lapse video by iPhone is also very simple. You just need open the camera mode, find an appropriate angle, and use a tripod to keep your iPhone steady.

Get the right format of photos
It usually takes hours or even days to take time-lapse photography, so you’d better leave enough space for your memory card to record the whole process of a scene. Apart from wiping the data of your memory card before shooting, you could choose JPG format. JPG format will save the disk space, while its pixel is not too low. Comparing with JPG, WMA is not a good choice. Though it has extremely high pixel, it will easily run out of your memory card during your recording. Therefore, WMA’s high pixel doesn’t worth you try it.
Watch out when shooting
In order to take more high-quality photos before you make time-lapse video, you should ensure that the camera works well, the tripod is stable, and the whole process won’t be disturbed or ruined by bad weather. In fact, you needn’t keep your sight at your camera during the whole shooting, but at least make sure it is safe from swaying or toppling.
How to make time-lapse videos
Editing the time-lapse photos
Before you merge the photos into a video, you may want to edit them, such as cropping, adjusting the brightness, or adding filters etc. Actually, for getting a better time-lapse effect, some basic editing of the photos is always necessary. Here we recommend Adobe Photoshop CC as the editor to help us modify our photos. Being one of the most popular photo editing tools, Adobe Photoshop CC is powerful enough, which offers users multiple editing options to create a satisfactory result. Check the followings to learn the basic operations.
- Download and install Adobe Photoshop CC.
- Add a photo to the editing area.
- Adjust the size of the photo.
- Adjust the brightness, add filter or something else to edit the photo.
- Click “File” > “Save As” to save the photo.
Combining the photo into a video
After you have collected all the photos, we can start to combine them to make time-lapse video, and we could use a video editing tool to make the following job a simple task. ApowerEdit is one of the excellent video editors which can help us not only merge photos into a video, but also edit the video further. To learn how to operate this tool exactly, you can check the instructions below.
- Download and install ApowerEdit by clicking the button below.
- Launch the program and then import the photo folder.
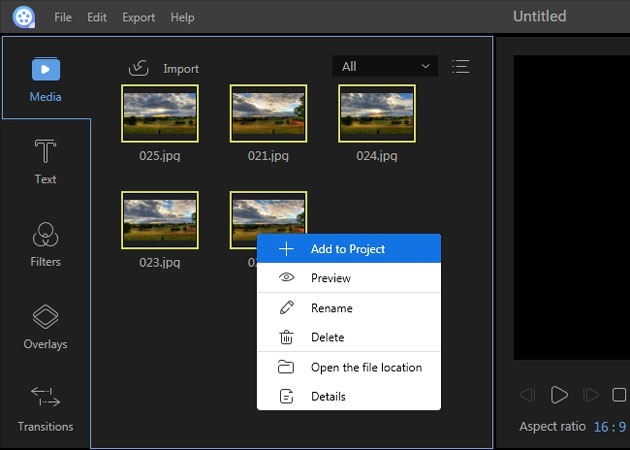
- Right click the photo in media library and then choose “Add to Project”.
- Right click the photo in track and then choose “Edit”.

- Click “Export” > “Export to video” to generate video.


Tip: ApowerEdit is an all-around video editor, which offers various effects for users to make choice. For example, you can add text, filter, or sound effect etc. to your video. So if you want to further edit the time-lapse video, you can use ApowerEdit directly.

Conclusion
All of those tips and tools suggested above are quite efficient for making time-lapse video. We hope you can get the best way to take time-lapse photography, and then create the best time-lapse video. All of these are great ways to do so and it’s worth trying out to find the easiest method for you.