Most people have spent much time on enjoying video on websites. But how will you do if you want to grab videos on your screen for review? There is a screen grab tool which enables you to save the videos you like in a quick and convenient way. Then let’s have a look at it.
Screen Recording Suite is lightweight screen video grabber which allows you capture everything on your screen. It is a solid choice that you will not regret to get it on your system. It doesn’t have a large interface, but it is a full-featured screen capturing software.
Some details are listed as follows:
1.Flexible recording modes
It offers several recording modes, which includes custom area, full screen, select window, around mouse and web camera. You can grab video from screen with the mode you require.
2.Grab video from web camera
Most people have experience in chatting with friends through web camera. The Screen Video Grabber will help you to save these chatting videos, if you intend to do so.
3.Grab screen video with audio
It is really convenient that you needn’t to concern about how to record the audio of your video. All the activities on your PC screen can be captured with sound.
4.Embed voice through microphone
The screen grab tool gives you the ability to record voice from system, microphone or both. While you are making your tutorials/demo, you are able to embed your own voice to your videos.
5.Take screenshot
It must be the quickest way to take screenshots. There are three kinds of capturing which are custom area, full screen and select window.
6.Convert videos
You can grab desktop video to WMV files by default. You also are available to convert videos to other formats with its build-in converter. Many popular formats, e.g. mp4, avi, flv etc. are offered. Therefore, you can easily import your videos to your portable devices.
7.Insert local video & audio files
This software allows you to insert your local audio files. You are able to trim your audios to the clips you want. While for video files, you can not only convert them, but also crop them.
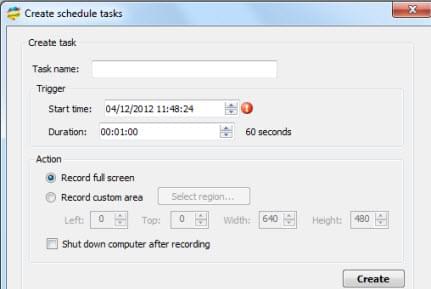
8.Create schedule task
If you are too busy to wait in front of your computer, then you can create your customized task to grab video from screen. What you only to do is to pre-set your settings.
You will benefit a lot from the screen video grabber. It is very easy to handle; you are able to snatch videos well even though you are a novice.
Let’s walk through these steps one by one.
1. Click the “options” button; from the pop-up dialog you will see various settings. You can reset them according to your requirement. E.g. you can choose to record mouse cursor or not.

2.Click the relatively button on the interface to choose the area you intend to grab. Then it will start to grab desktop video automatically. You can press hotkeys to pause and stop recording provided you have pre-set them.
In addition, let’s take a look at how to create scheduled task. From the interface, you will clearly see the button “create schedule task”. Click it, and then a dialog will pop up. From it, you can set start time, duration and record area. It also allows to shut down computer after recording.

It is a necessary to get this screen video grabber on your computer desktop. With it, you are able to do lots of things, ranging from making tutorials to recording onscreen videos. Just to get it now and makes it to do your individualized task.